Create a Nature Inspired Painted Background in Photoshop
Step 1
Before we get started, you need to grab a couple of freebies and put them in your Photoshop brushes folder:
Watercolor Brushes from Bittbox
Complete Tree Brush Pack from Brusheezy
Since we are designing for the web with a target resolution of 1024px wide, lets open a new document and set the width to 1100px and the height to 900px. That should give us plenty of room to work.
First we need to decide what our painting will consist of and what our color scheme will be. For this example, I have decided to use three main layers of color: the sky, distant mountains, and a rolling hill with trees. I like to create swatches of the colors I will be using so I can quickly select from them.

Step 2
Now it’s time to start painting. Let’s start with the sky since it is behind everything else. Select the Brush Tool (B), and then from the Brush Preset Picker, load BB_Watercolor_II. These are the watercolor brushes that we downloaded from Bittbox, and they are high-res brushes, so make sure to keep the brush size between 300 and 400.

From our sky color palette, select the lightest color. Begin in the middle of the document and start placing single brush strokes across the page using different watercolor brushes set at varying sizes. Continue to place strokes until you have painted an area that spans the width of the document and is about 300px high.

Just like a real painting, don’t over work it. You will end up losing all of the stroke details that make these brushes so beautiful.
Now repeat this using the other colors from the sky palette, each time moving up so that you are overlapping the previous color.

Step 3
Now lets create the distant mountains. Pick the mid tone color from your mountains palette and using the Pen Tool (P), draw the desired shape of the mountain range spanning the length of the document. This will act as a guide for our brush strokes and a solid foundation of color.

Select the Brush Tool again, and select a watercolor brush that is mostly flat on top. Don’t forget to keep the brush size around 300px. With the top edge of the brush slightly overlapping the top edge of the mountains, follow along the curve placing strokes along the way. This will replace the smooth edge with small brush marks.
Our mountains are a little flat, so lets give them some depth. Select a brush that has a nice angle and set the size between 100 and 150. Using the darkest and lightest colors for our mountains, add shadows and highlights. Remember to keep it subtle since the mountains are still far away and details should be minimal.

Step 4
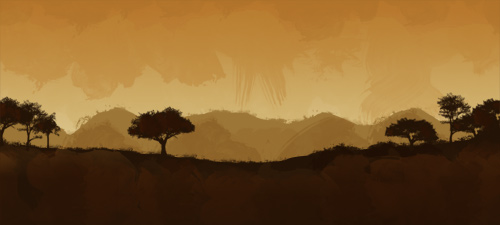
Let’s use the same technique from Step 3 to make the rolling hill in the foreground. Only this time keep the curves much flatter and use the darkest color from our hill palette. Also, make sure the placement doesn’t cover up too much of the mountains.
Now, lets bring our hill to life with some trees. As you did earlier with the watercolor brushes, load in the tree brushes. The name of the set is Trees_by_Horhew. These are also high-res, so size them down accordingly. Placement is totally up to you, but dont overdo it.
After the trees are in place, use the remaining colors chosen for our hill to give our foreground some detail. Choose a watercolor brush again, and add random stokes to the hill. Also, size you brush way down so that it is smaller than the trees, and use it to add highlights and shadows to the foliage.
Step 5
The colors and brush strokes of our painting look really great, but everything seems a little too smooth. It needs some texture. Create a layer above all of the other layers, and set it’s blend mode to multiply. Using the Brush Tool, select one of the watercolor brushes. Only this time, leave it set to it’s maximum size. Select a mid-tone color from the sky, and apply one brush stroke in the middle of the document. Using this oversized brush allowed a lot of detail and texture to be added in one click. Experiment with the different brushes to achieve the best affect.

Step 6
The texture helped, but it is still a little too smooth. Merge all of the layers, and add some noise(Filter > Noise> Add Noise) with an amount of .3.
Step 7
Finally, lets add a mocked up website layout to see how our painted background looks.

The great thing about this technique is that it is really easy, fun, and the possibilities are endless. Experiment with different colors, and try using some great landscape photos as inspiration.
, and then from the Brush Preset Picker, load BB_Watercolor_II. These are the watercolor brushes that we downloaded from Bittbox, and they are high-res brushes, so make sure to keep the brush size between 300 and 400.</p> <p><img alt="painted_bkg_brushes1.jpg" src="http://designreviver.com/wp-content/uploads/2008/05/painted_bkg_brushes1.jpg" /></p> <p>From our sky color palette, select the lightest color. Begin in the middle of the document and start placing single brush strokes across the page using different watercolor brushes set at varying sizes. Continue to place strokes until you have painted an area that spans the width of the document and is about 300px high.</p> <p><img alt="painted_bkg_sky_1.jpg" src="http://designreviver.com/wp-content/uploads/2008/05/painted_bkg_sky_1.jpg" /></p> <p>Just like a real painting, don’t over work it. You will end up losing all of the stroke details that make these brushes so beautiful.</p> <p>Now repeat this using the other colors from the sky palette, each time moving up so that you are overlapping the previous color.</p> <p><img alt="painted_bkg_sky_2.jpg" src="http://designreviver.com/wp-content/uploads/2008/05/painted_bkg_sky_2.jpg" /></p> <h4>Step 3</h4> <p>Now lets create the distant mountains. Pick the mid tone color from your mountains palette and using the Pen Tool (P), draw the desired shape of the mountain range spanning the length of the document. This will act as a guide for our brush strokes and a solid foundation of color.</p> <p><img alt="painted_bkg_pen.jpg" src="http://designreviver.com/wp-content/uploads/2008/05/painted_bkg_pen.jpg" /></p> <p>Select the Brush Tool again, and select a watercolor brush that is mostly flat on top. Don’t forget to keep the brush size around 300px. With the top edge of the brush slightly overlapping the top edge of the mountains, follow along the curve placing strokes along the way. This will replace the smooth edge with small brush marks.</p> <p>Our mountains are a little flat, so lets give them some depth. Select a brush that has a nice angle and set the size between 100 and 150. Using the darkest and lightest colors for our mountains, add shadows and highlights. Remember to keep it subtle since the mountains are still far away and details should be minimal.</p> <p><img alt="painted_bkg_mountains_2.jpg" src="http://designreviver.com/wp-content/uploads/2008/05/painted_bkg_mountains_2.jpg" /></p> <h4>Step 4</h4> <p>Let’s use the same technique from Step 3 to make the rolling hill in the foreground. Only this time keep the curves much flatter and use the darkest color from our hill palette. Also, make sure the placement doesn’t cover up too much of the mountains.</p> <p>Now, lets bring our hill to life with some trees. As you did earlier with the watercolor brushes, load in the tree brushes. The name of the set is Trees_by_Horhew. These are also high-res, so size them down accordingly. Placement is totally up to you, but dont overdo it.</p> <p>After the trees are in place, use the remaining colors chosen for our hill to give our foreground some detail. Choose a watercolor brush again, and add random stokes to the hill. Also, size you brush way down so that it is smaller than the trees, and use it to add highlights and shadows to the foliage.</p> <p><img alt="painted_bkg_hill_1.jpg" src="http://designreviver.com/wp-content/uploads/2008/05/painted_bkg_hill_1.jpg" /></p> <h4>Step 5</h4> <p>The colors and brush strokes of our painting look really great, but everything seems a little too smooth. It needs some texture. Create a layer above all of the other layers, and set it’s blend mode to multiply. Using the Brush Tool, select one of the watercolor brushes. Only this time, leave it set to it’s maximum size. Select a mid-tone color from the sky, and apply one brush stroke in the middle of the document. Using this oversized brush allowed a lot of detail and texture to be added in one click. Experiment with the different brushes to achieve the best affect.</p> <p><img alt="painted_bkg_big_brush.jpg" src="http://designreviver.com/wp-content/uploads/2008/05/painted_bkg_big_brush.jpg" /></p> <h4>Step 6</h4> <p>The texture helped, but it is still a little too smooth. Merge all of the layers, and add some noise(Filter > Noise> Add Noise) with an amount of .3.</p> <h4>Step 7</h4> <p>Finally, lets add a mocked up website layout to see how our painted background looks.</p> <p><img alt="painted_bkg_12.jpg" src="http://designreviver.com/wp-content/uploads/2008/05/painted_bkg_12.jpg" /><a href="http://designreviver.com/wp-content/uploads/2008/05/painted_bkg.jpg" target="_blank">View full size </a></p> <p>The great thing about this technique is that it is really easy, fun, and the possibilities are endless. Experiment with different colors, and try using some great landscape photos as inspiration.</p></p>&source=PhoToShoP TuToRialS)